The Non-Frigid Fridge

Over the past six months or so, we’ve noticed that our kitchen refrigerator has been having issues with staying at the right temperature. It would stay ok for a while, then one day decide it wanted the fridge part to be at, say, 59 degrees, and the freezer part to be at, say, 30 degrees.

This doesn’t make for a very frozen freezer or frigid fridge. Nope, it makes for a lot of spoiled food… and milk that goes bad just a few days after bringing it home.

Luckily, there’s a “turbo cool” button on our fridge… sort of like what I lovingly referred to as the “turbo boost” button on my old Hyundai Accent that would give it a little extra boost when it was struggling climbing a hill.

The “turbo boost” worked for a while, but last week we noticed that it wasn’t really doing much in terms of helping cool the fridge anymore. And the freezer started oozing different shades of colored watery melty grossness. So we moved all the perishable items out of the fridge (left the stuff like soy sauce, ketchup, and raisins) into our beer fridge in the garage. (Yes, we have a beer fridge. We’re not quite grown-ups yet. ;P )

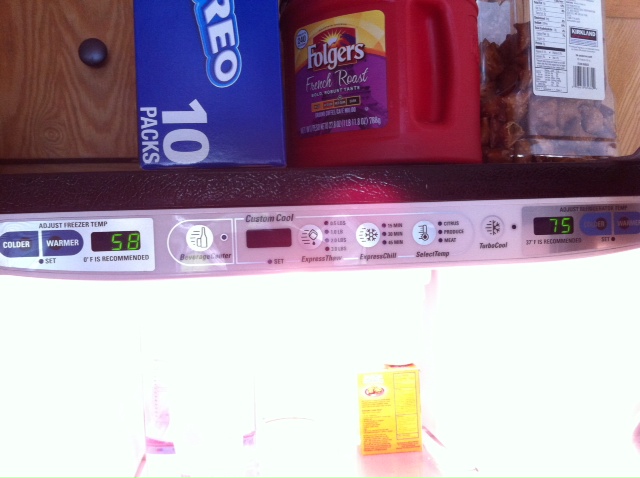
And then we noticed this:


Non-frigid fridge & freezer

Yes, we buy Oreos from Costco, and massive containers of peanut butter pretzels, and drink Folgers.

Yup, that’s right. Our freezer was at 58 degrees F, and the fridge was at a hot 75. I’m pretty sure it was warmer in our fridge than it was in our house.

We called the freezer contents a total loss – which was sad because I had so many good things in there! Frozen produce from last summer’s harvest, frozen homemade waffles (well, homemade with Bisquick… that counts, right??), homemade chicken stock, and the like. But, it was a total loss. The frozen tomatoes were mushy and watery, something had melted and leaked all over the rest of the stuff in the freezer, the waffles were soggy, and I sure wouldn’t trust tepid chicken stock.

Of course we left all the now-thawed stuff in the freezer until I had the energy to deal with it. Which meant several days of gooey ooziness leaking from the freezer. Which we sopped up with strategically-placed rag towels. Let’s just say we did a lot of laundry.

In the meantime, we called up the home insurance company to come fix or replace our fridge. I’m SO glad it’s covered by the insurance – it came with the house when we bought it, so was automatically included on the list of covered items.

Last Friday, a repairman came out to work on the fridge. (Luckily for him – and for me – I had emptied out the rest of the freezer and fridge by then, and cleaned up the remaining freezer ooze.)

He worked behind the fridge for a while, and discovered that our <> compressor is broken. He said that he has some replacements in his truck, but none that would fit our model of refrigerator, so he had to get it special ordered. He said he’d be in contact in about ten days.

Luckily we have that beer fridge in the garage!

So for now, we’re living out of a miniature refrigerator in the garage. Not a dorm-type mini-fridge, but one of those small ones that’s about 5′ tall and is commonly found in studio apartments. So yeah, not a whole lot of grocery shopping going on here!

We got a call this morning from someone involved in the part-ordering process. I’m not sure exactly who it was or where they were calling from, since my husband answered the phone call, which came in at 7am when I was determined to keep sleeping and enjoying the odd dream I was having (which I don’t remember anymore, unfortunately!). He said that they’re trying to locate a replacement part. Trying to locate.

If they can’t fix the fridge, we get a new one! I’m kind of hoping that they can’t fix it, so we can pick out a brand-spanking-new fridge. And I have my eye on the same one that we bought shortly before we sold our old home, with double doors up top and a slide out freezer on bottom. In stainless steel, of course. Ooooooh, yeah!

My fingers are crossed that we’d get a large enough allowance on a new fridge to afford the fancy-schmancy one I’m pining for! Our current (broken) fridge is a nice one, stainless steel and looks pretty fancy, so I’d hope we’d get enough to at least cover replacement with the exact same model.

Stay tuned for an update or several on the fridge front…
Shepherd’s Pie with Cheese-Crusted Leeks

Last night, I decided to make a shepherd’s pie for dinner. I pretty much always make a shepherd’s pie the day after we have a whole roasted chicken for dinner – it’s a great way to use up a lot of the leftover chicken without having.. straight-up leftover chicken.

To get started, I drizzled a couple tablespoons of olive oil into a large pan, added a couple tablespoons of butter, and threw in two to three big handfuls of prepared leeks (read here how to prepare them for cooking). I set the pan on medium low heat, and let them cook for about ten to fifteen minutes, stirring occasionally, while I worked on chopping up the other ingredients.

I diced up the chicken, and sliced some green beans from the garden into about 1″ pieces, cut on the bias (at a 45-degree angle). I also had some baby carrots in the fridge, so I sliced those into rounds about 1/4″ thick. There was also some fresh basil in the fridge, so I took some of that and chopped it up, too, to boost the flavor of the dish.

Once the leeks looked and tasted nice and soft, I added some salt and pepper and removed them to a small bowl for later.

Then I sauteed the sliced carrots in the remaining oil for a few minutes, to soften them a bit. Note: don’t cook to long, otherwise they’ll get mushy in the oven when you cook your shepherd’s pie! Saute them just long enough so the are tender but still firm on the inside.

In a large bowl, I gently stirred together the chicken, green beans, carrots, basil, and most of the leeks – I saved some leeks to use for the topping of the shepherd’s pie.

Next, I worked on the gravy part of the shepherd’s pie. I added to the (now empty) pan about a tablespoon EACH of butter, olive oil, and flour. I turned the heat to medium and with a whisk, stirred until the flour was dissolved into the butter-oil mix. I removed it from the heat, and poured in some chicken stock (about 3/4 to 1 cup). Then I added some Worcestershire sauce (a few shakes, to taste), and some pepper (to taste). Whisk or stir to mix. Added salt is not necessary, since the chicken stock (mine was from a bouillon cube) was already pretty salty. If you use a low-sodium or homemade stock, taste the gravy first to see if it needs a little added salt.

I then just scooped the chicken-veggie mixture into my unbuttered, ungreased, un-Pam-ed baking dish (I use either an 8×8 glass dish or a smallish casserole dish, which yields enough shepherd’s pie for two plus one dinner of leftovers). Next I poured the gravy mixture over the top, and topped it with some leftover mashed potatoes I had made the night before to accompany the roast chicken.

It’s important NOT to add the gravy to the meat/veggie filling, but rather add them to the baking dish separately. Trust me, I’ve done it and it ends up in a goopy mess once you stir the liquid into the filling. And no one likes that! And if you’re worried about some parts of the pie being dry, fuhgettaboutit! Pouring the liquid over the top AFTER the filling is in the baking dish is just fine – the liquid will distribute throughout the pie during cooking, and you’ll end up with a succulent, moist, chunky, perfect shepherd’s pie.

You could also try adding a little milk to the gravy before pouring on top, or replace the stock with milk. Just don’t add too much (you can always add more, but can’t add less), and please don’t cook the milk on the stove top before adding to the pie! Scorched milk is oh-so-gross, and heating it beforehand is just not necessary.

Once the mashed potatoes are added to the top of the pie – and they don’t have to be completely level; in fact, some peaks and valleys in the potato topping makes for some nice browning action – it was leek time. I sprinkled the remaining leeks (which I had reserved earlier) on top of the potato, and followed with a sprinkling of Parmesan and cheddar cheese. Again, use whatever cheese you please – that is, any hard cheese you please. Please don’t use feta, goat, bleu, brie, Camembert, or other crumbly or soft cheese. This will not end well, and you’ll be sad you ruined your beautiful and otherwise tasty shepherd’s pie.

Next I popped it in oven for about 30 minutes until the cheese was melted and the peaks/valleys in the top showed a little browning action.

This is a great meal to have by itself, since it has protein, carbs, and veggies all in one. Or you can serve with a side salad or maybe some bread, if it tickles your fancy. And the leftovers are pretty amazing, too. :)

A note on shepherd’s pie: I’ve made shepherd’s pie many times, and have tried different vegetables depending on what I had on hand. I’ve used a frozen veggie mix (carrot, corn, green beans), fresh carrots, leftover cooked root vegetables a variety of vegetables will work – just use what suits your taste and what you have in your kitchen. (A shepherd’s pie is, after all, a great way to use up leftovers!) I’ve never used it, but I bet diced celery would make a great addition to this dish, maybe with some carrots and onions. I try to stick with about three kinds of vegetables – otherwise it gets too busy and crazy in pie-town! I imagine if you used some leftover roasted root vegetables (think carrots, parsnips, onions, maybe even potatoes), these would add great flavor to the shepherd’s pie. Just dice them up and throw them in! Have leftover beef or other meat instead of chicken? Use that! I just tend to use chicken because 1. We eat it quite frequently and so often have leftovers; and 2. It’s not as rich as other meats so the shepherd’s pie has a less-heavy taste to it, which I prefer.

The shepherd’s pie turned out great!! And what a great way to use up some leeks! They lend a mild onion flavor to the dish. We ended up pairing it with some breadsticks from Trader Joe’s that we had in the fridge. And we’ve got just enough pie for one meal of leftovers… which is sometimes better than fresh, since the flavors have had a chance to all meld together for a day or two. :)

For my recipe for Shepherd’s Pie with Cheese-Crusted Leeks, click here.

Leeky Harvest, Tomato Wrangling… and a Fallout Shelter?

Yesterday I finally got around to adding a second level to the cages around two of my tomatoes, who have already outgrown their 3′ first-level cages and were dangling over the top. Luckily the cages I have are stackable! (And, collapsible when not in use!) They’re from Gardener’s Supply, and I love them. Eventually I’ll need to add second levels to all the other tomatoes as well (and maybe the eggplants), but for now, only two needed them.

While doing this, I noticed that many of my leeks are big enough to harvest! I pulled a bunch of them up, including all eight that I had transplanted into grow bags <link to transplant post in Garden and/or Living>. I’m not sure what I’ll use them for yet (maybe I’ll give potato-leek soup a try!), but figured I could harvest, clean, and prep them in the meantime. I do know that leeks can be used like onions in a variety of recipes (just be sure to always cook them before eating!), as well as used for flavoring in stocks, and in fact, the French use them in most every dish!

Leeks are VERY dirty within their leaves – it’s because of the nature of how they grow. They grow deep in the soil, and in order to get a longer white (edible) part, you can hill up around them as they start to grow taller, and through this they get even dirtier. So it’s important to wash them well before preparing.

I read online that it’s easiest to first cut off the dark green tops (which are inedible but some people use them to flavor stocks), then lay the leek flat and cut in half almost to the root end, turn 1/4 turn, and to the same again. You end up with a nice fan of leaves, which you can swish in a big bowl of water a few times to remove all the grit.

Once they’re cleaned, you can just chop them up and add to recipes. Or, freeze for later use.

I ended up cleaning and chopping them, and bagging them. I think I’ll use some tonight and then probably freeze the rest. I might add some to a stir fry of squash (from the garden – I have TONS of baby squash right now, already! <link to update post in Garden>), green beans (also from the garden), and whatever other veggies I have in the fridge. We’ll see how ambitious I am after work tonight. :)

After harvesting leeks and adding second-level cages to my tomatoes, I decided to check out some random tomato-looking plants that had popped up in the unfinished section of the Back40 <link to discovery post in Living and/or Garden>. They’re still doing great despite minimal watering (whenever I think about it, probably a couple times a week). I smelled their leaves, and sure enough, they’re tomatoes! One of them also has two tiny tomato blossoms forming. Awesome!! The birds must have carried seeds over, and somehow they sprouted without hardly ANY water (I wasn’t watering in that area until I noticed them, so they must’ve just survived on what they found in the soil – their root systems must be super strong already!). I popped a couple spare tomato cages over them to wrangle them as they grow – the larger ones with the blossoms was already growing across the ground, and its side shoots were growing skyward to compensate. Hopefully they’ll straighten themselves out now that they’re caged. We’ll see how the two surprise tomatoes do! Hopefully they’re grape tomatoes, since I discovered that the two grape tomatoes I planted here <link> are growing large tomatoes instead. (Boo! I love grape tomatoes! Popping them straight from the vine is soo satisfying!)

My husband came home from work having been to the county to check out the original floor plans of our house. He said that when they pulled out the plans, they were on a large sheet of barely-holding-together paper. When the woman came out with the plans, she asked him to confirm our address, and then said, “You’re the one with the fallout shelter?”

Obviously we had no idea that our backyard contained a fallout shelter!

The woman said that it was most likely constructed, but there are definitely plans for it in the original property plans. We do have a manhole in the back part of our backyard, which we always thought was connected to a sewer line that maybe was constructed before our house was (in the early ’60s). The cover has an “S” on it, and a couple holes in the top for lifting. We figured “S” stood for “sewer,” but maybe it in fact stands for “shelter”? We did wonder why we never smelled anything, if it was in fact a sewer access hole.

So of course, we had to know! My husband came home, and we set out trying to find a tool that could help him lift the heavy, thick metal cover off the manhole. Turns out a mattock pick was the right tool.

After much pushing and pulling and heaving and ho-ing, we eventually got the top off. And what did we see? An old metal ladder going down, and two streams of flowing water intersecting.

Bah! Looks like a sewer after all. But maybe it used to be a fallout shelter? I like to think so. Maybe after the danger of the war was over, they decided to add a sewer access where our fallout shelter was conveniently located and already excavated.


Guess Who’s Back… Back Again

Well…. it’s been a while since my last blog post! I got really busy with work (tax office = crazy hectic from February to April 16), and then got busy with catching up on everything I didn’t have time to do during tax season. So, after recovering, I’m back and determined to post regularly again.

A few updates:

– In late April / early May, I planted our summer veggie garden. This year I decided to diversify a bit more rather than planting several of each vegetable, since last year I ended up with a TON of certain things (for example, tomatoes, eggplant, and squash). This summer’s veggie garden includes:

  • Tomatoes: two grape, one early girl, one better boy, and two heirlooms that I received from a client at work (he grew a bunch from seed and ran out of room to plant the seedlings). I ended up not having room for 15 of the 17 seedlings he gave me, so I gave the majority away to my mom and my brother. I still have five left in pots waiting to get planted, so maybe I’ll pull out the grow bags from last year. A bonus of planting them super late is that my tomato season will be extended :) As long as the weather doesn’t do anything crazy – but that’s a benefit of living where we do – mild, pleasant weather pretty much year round! Rough, I know, but someone’s gotta live here! 😉
  • Eggplant: two different varieties, both with a purplish skin that is white at the top. Pretty sure I grew both of these varieties last year (the names are slipping my mind at the moment), and they were both delicious and fun! I’m not growing any Japanese this year – although they did extremely well last year and the year before, I found that I was ending up with an overabundance of them and limited ways to prepare them because of their shape (long and slender).
  • Bell peppers: three plants – I think I picked up an orange and two red, or maybe a yellow and two red?
  • Other peppers: one jalapeno, one banana pepper, and one other pepper (again, the type is slipping my mind. Hey, it’s been a couple months, and they’re not producing yet!).
  • Green beans: a pole variety six-pack from the nursery.
  • Cucumbers: one Persian and one burpless slicer (called something like “burpless salad cucumber” on the tag). Actually though, there were two plants in each 4″ pot, so I guess I have two plants of each type.
  • Squash: one zucchini and one crookneck (again, there were two plants in each pot, so I have two plants of each).
  • Radishes: Easter Egg variety (they grow in a variety of bright colors, from pink to purple) – I had a lot of seeds leftover from last summer, so I just sowed a few here and there in some empty corners of one of my raised bed, and when I harvest a few, I just pop a few more seeds in their place.
  • Kale: from seed. I’ve been eating a lot of kale lately (it’s a major component in my breakfast smoothies), so when I saw the seed packets in the local home improvement store / nursery, I figured I might as well sow some and see how it goes.
  • Beets: from seed. I love marinated sliced beets, like you find in good salad bars, but I’ve read that you can actually cook them a variety of ways and that they’re delicious. So again, I figured, why not? For a few dollars, I picked up a seed packet that will probably last me a few years.
  • Herbs from seed: cilantro and basil. I also planted thyme, parsley, and some lettuces from seed, all at the same time, using shoe wall pockets which I hung on the shed by the veggie garden. I’ll have to do a full post about that experiment, which did not turn out like I’d hoped. Turns out I was watering too little, so several of the tiny seedlings didn’t make it. At the same time, I was watering the flowers – which I’d also planted in the wall pockets – too much, so a lot of them rotted and died. I transplanted the surviving herbs into a big pot on the patio, and transplanted the surviving flowers into the Back 40 (most of which are doing well now). The herbs, though, are still very small seedlings, and I try to water them consistently so I have fresh herbs for the summertime for salsas, caprese, etc. If they don’t end up working out, I may pick up some 4″ herbs from Home Depot and just plop them in the ground so I at least have some herbs to snip leaves from. It seems a waste to buy a bundle from the store every time I need some, because it seems I never end up using the whole bunch. I prefer being able to snip a few leaves here and there, and have growing herbs in the garden when I want them, rather than having to go to the store every time.
  • Asparagus: these are growing in the back section of our backyard, which I refer to as the “Back 40.” When reading about growing asparagus, I was surprised to learn that they live 15-20 years or so! However, they do require that you don’t harvest anything the first two years after they’re planted, so that they can spend all of their energy on establishing a strong root system. So, I planted them in the Back 40 among a bunch of tropical plants so that when they die down in the winter, they’ll be surrounded by beautiful plants and I won’t have a gaping hole or an eyesore to worry about. This is the first time I’ve grown asparagus. I purchased a bag of three crowns from Home Depot (kind of an impulse buy), learned about them, and planted them, being sure to follow the instructions of digging deep holes and adding a couple of inches of dirt every couple of weeks until they were completely covered. Two of the three came up – one so much later than the other, in fact, that I figured only one had survived. I think having two plants survive is pretty good. Like they say, “two outta three ain’t bad.”
  • Potatoes: again, it’s my first time growing them. I purchased two bags of seed potatoes (ten seed potatoes per bag) from Home Depot at the same time that I purchased the asparagus crowns. I planted them in two rows (one for each type – some sort of red and some sort of white or yellow – I don’t recall the exact varieties at the moment) in the Back 40, using good soil and the hilling technique. I ended up purchasing some boards from Home Depot, which I had cut in-store to about 18″ wide and 10′ long, and used plastic-coated garden stakes to hold them up sort of like little retaining walls. Using this method, I’ve been able to hill on a hillside without the dirt going everywhere. Again, the potatoes were planted among my tropical Back 40 plants, so once they’re done, I can just pull them out, remove the extra dirt, and not have a huge eyesore. Some of the plants are dying off already, which means almost time to harvest! Some are still pretty green, but are flopped over a little, getting ready to start calling it quits. I was concerned at first when they started doing this, since I had read that potatoes are often ready to harvest in September. I thought maybe I was overwatering or underwatering – and it’s hard to tell with potato plants until you harvest the potatoes themselves – but if I recall correctly, the varieties I planted said they were early varieties – meaning, ready early – so I guess harvest in late June / early July makes sense. Hopefully! Fingers crossed.

Other items I had already growing in my veggie garden:

  • Leeks: I got a bunch of leek starts from my sister last December. She had ordered them and ended up with too many once she had planted all that she could fit in her garden. They are still growing strong, but I did end up transplanting a few into grow bags when I planted the other veggies. Some are definitely ready to harvest – maybe I’ll do that this weekend. I have to do some research, though, as to how to prepare them (aside from the ol’ leek and potato soup – one can only eat so much soup in the summertime!).
  • Red bulb onions: these are also from my sister. Same story – she had too many, so gave me a bunch. I tucked them in at the same time as the leeks, careful to space them according to the instructions she sent me. I’ve already harvested about a dozen, and they’re currently curing (to allow the skin to harden to ready them for storage). I still have a bunch in the raised beds that should be ready to harvest soon (a couple weeks after their green tops fall over).
  • Bunching (spring) onions: these are leftovers from last year, when I planted them from what I now believe were starts. I didn’t know that I should’ve spaced them – I just plopped the contents of the 4″ pots into the soil without separating out the tiny starts. So now, they’re growing super close together and are hard to harvest. I end up just harvesting a bunch at once, cleaning them, and putting them in the fridge in a glass of water, and then make sure to use them within a few days. Maybe I’ll get around to thinning them out once they’re a little less full and vivacious (some are already starting to get some brown leaves). I already transplanted two big bunches of them to pots when I planted the summer veggies, and they are thriving! I didn’t thin them, though, so I figured they can just hang out and be ornamental, and help attract bees and other pollinators as they shoot up their flowers. So far, it’s working great. I’ve noticed more bees and butterflies coming around this year than last year, which is fantastic for pollination and also bad-bug control. Hopefully the ladybugs will soon follow, to help keep the aphid populations down.
  • Swiss chard: again, leftover from last year. I figured they would die off once summer came to an end, like the other veggies I planted around the same time. When I was younger we grew Swiss chard, but I don’t remember it being an ever-bearing and ever-growing plant. But I guess in our area they are! They are going gangbusters! It seems like every time I turn around, they are huge and full and need some harvesting / “pruning” back to keep them from taking over a whole raised bed. I usually end up taking off a bunch of leaves, cooking up the best ones for dinner, and putting the others in the compost bin. I figure it’s not quite as wasteful that way. :)
  • Sorrel: again, leftover from last year. These, too, are going gangbusters, and like the bunching onions, I transplanted some to a pot on our patio. As long as I remember to water it, it stays pretty happy. And it’s more convenient to harvest a few leaves as part of a dinner salad when I can just take a few steps over to the potted one (especially once dusk falls), instead of trekking all the way over the the raised beds (which currently don’t have lighting aside from solar path lights). Sorrel leaves have a lemony taste. I also found a recipe last year for sorrel pesto, which I’ve been interested in trying but haven’t gotten around to it yet.
  • Red-veined sorrel: again, leftover from last year. I ended up moving these from their last-year’s location to a different raised bed where they would have more room, and spread them out a bit. They’re also great to add to salads for a pop of color and an interesting flavor.
  • Mounding nasturtium: again, leftover from last year. I moved this to a pot next to the potted sorrel. Its leaves and flowers are edible and are fun additions to salads. They lend a slightly spicy taste.
  • Calendula: again, leftover from last year. I saw little plants coming up in the raised bed where they were planted last year, so quickly transplanted them to a pot on the patio before they grew too large. (They tend to do that.) They’re edible flowers that can be added to salads, used as garnish, etc.
  • Strawberries: I transplanted last year’s strawberry plants into hanging baskets and hung them on the pergola above our patio. I’ve gotten a few berries off of them, but they don’t seem as happy as they could be. I also have a strawberry plant that I’ve had for several years, sitting in a pot on the patio. It’s doing pretty well, and I’ve gotten a few berries off of it, too. (It’s much happier than it was sitting in a neglected area of our side yard, where it got the occasional water when I remembered to do so.)
  • Carrots & parsnips: I planted seeds for both of these in a section of one of the raised beds last year, when I planted the summer veggies in the beginning of May, and they seem to keep reproducing. I haven’t planted any additional seeds, but I seem to be pulling many more carrots and parsnips than I originally planted. I still have seeds left from last year’s packets, so I think I’ll plant some for winter in a month or two.
  • Spicy oregano: again, leftover from last year. I pruned it back when I planted some tomatoes in the same raised bed, and also transplanted a chunk of it to a pot on the patio for easy access. I’ve been snipping it back and drying the leaves, and already have about 3/4 of a big mason jar full of the dried herb. I’ve been using it wherever I can, and am excited to use it this winter in all those great winter soups, stews, and slow-cooker dishes like pot roast!

I think that’s it. (It? That’s a TON of stuff!) I’ll hopefully post some pictures soon so you can actually SEE what’s growing rather than just reading about it!

Bang Up Job

A couple weeks ago I was at my hair stylist getting a trim, and I mentioned that I felt “blah” and in a hair rut. She suggested, “Hey! How about bangs?”

To which I basically replied no way.

You see, I was picturing the bangs I had when I was little: delicate, fringy, and above the eyebrows. Which look cute on little kids, but there was NO WAY I was going to let her give me those now. No. Freaking. Way.

So I went home, laughed a little about the bang thing, and went to bed.

The next couple of days, I kind of fought with my long-sideswept-bangs. The weren’t really behaving well since I got them trimmed. A spritz of hairspray didn’t even seem to help after the first few hours.

So I started thinking about bangs. What if I got thick, long, chunky bangs? Sassy indie bangs like Zooey Deschanel and Jennifer Lawrence are wearing?

An hour of Googling later, and I’d made my decision: BANG TIME! So without further ado, I called my stylist and booked in for an early morning appointment, inspiration photos in hand (well, more like in-phone, but still.). And…. voila!:

My new bangs

I love my new ‘do!! Fun and sassy – I can’t wait to try adding some texturizing product to my bangs to make them a little more chunky. And I’m excited to try different styles like wavy hair + bangs, updos + bangs, ponytail + bangs, hey even braids + bangs! In fact, I’ll be trying the whole wavy hair + bangs thing this weekend at the wedding of my friends Kate and Paul. (Kate was the one who introduced me and my hubby years ago! And she caught my bouquet at our wedding in 2011!) And ya know I’ll update you on how the wavy hair + bangs hairstyle goes.

I got some funny (all positive, but still funny!) reactions as my co-workers trickled in to work this morning and saw my new cut. “Wow, you DID something to yourself… If you were a guy I’d say you got a haircut. But this is more like a whole different style!”, “Bangs, bangs, bangs, you and Michelle!” (referring to Michelle Obama’s recent bang cut, which I actually hadn’t seen until I Googled it following his comment.)The best reaction I’ve gotten to the new ‘do so far? “Oh! Wow! You look like a runway model!”

I’ll take it.

Kicked It

As my friends know, I have been a little addicted to caffeine for several years. And by “a little addicted,” I mean I get the.worst.headache.ever. if I don’t get my morning cup o’ joe. I’m not one of those drink-a-whole-pot-by-myself kind of people, just one mug worth is all I require, and I’m good for the day. But, that one mug worth must be delivered to my system within a few hours of waking up, otherwise the headache starts kicking in.

Caffeine isn’t the worst of addictions, for sure, but I figured I now would be a good time to kick it. So a few weeks ago, I started gradually reducing the size of my morning cuppa, little by little, until last week I was down to one inch of coffee. And no headaches.

Yesterday, I had one sip of coffee before heading out the door to work.

Today is my first day sans cafe’. We’ll see how I do. So far I’m feeling bright-eyed and bushy-tailed, and I’m crossing all digits that my head doesn’t decide to punish me for taking away the very last sip of sweet caffeinated bliss.

I’ll let you know how it goes!

Update: Success with day 1 sans cafffeine! No headache, no tired feeling! Hurrah!

Winging It

It’s Super Bowl time!

In less than 24 hours, Super Bowl XLVII kicks off with the San Francisco 49ers vs the Baltimore Ravens playing in New Orleans’ Superdome. Now usually I’m not a football fanatic, but I do get into the game when the 49ers are playing or when the Superbowl rolls around. You see, I grew up in Santa Cruz county, so I guess you’d say the Niners are my team.

Anyway, back to the Big Game. We usually go over to our friend’s house across town and watch the game along with a big group of friends, gathered around a big TV and hovering over a big spread of game-day goodies.

I bring the eight-layer dip. Ohhhh yes. Eight-layer dip. Eight layers of tasty Tex-Mex served with a big bowl of tortilla chips for dipping. I can’t wait.

This year, we’ll also be bringing some buffalo wings. I’ve never made them before, so in the best interest of the taste buds of my buds, I tested out my recipe today for any necessary tweaks. And boy were they delicious!

buffalo wings

Fingers crossed they turn out as finger-licking good tomorrow! And fingers crossed for the Niners in their Quest for Six!

January Challenge

This January I decided to do a little experiment.

I had recently reorganized our three freezers (yes, three – one in our kitchen side-by-side fridge/freezer, one small top freezer in our garage fridge/freezer, and a chest freezer in the garage). I put all the frozen veggies, fruit, and sauces in our kitchen freezer, the meats in the small garage freezer, and all the other stuff (frozen potatoes, breads, and desserts) into the chest freezer. And guess what? Every. Freezer. Was. Full.

I decided to impose a challenge upon myself. For the entire month of January, I would cook meals using only what we had on hand. No grocery shopping. I would not only save us some money, but would clean out our overstuffed freezers in the process. But could it be done?

Turns out, it can be done. I got the freezers much emptier and saved a bunch of hard-earned cash. And I discovered one more perk of this experiment: it forced me to get creative in my meal planning. Nothing like using what ya got and boosting your creativity quotient in the process!

Yesterday, it being February 1st, I was delighted to go grocery shopping again! I spent a good hour in the grocery store, and found that during my leave of absence (haha) they’d moved a few things around. I used to know that store like the back of my hand! I guess a lot can change in a month!

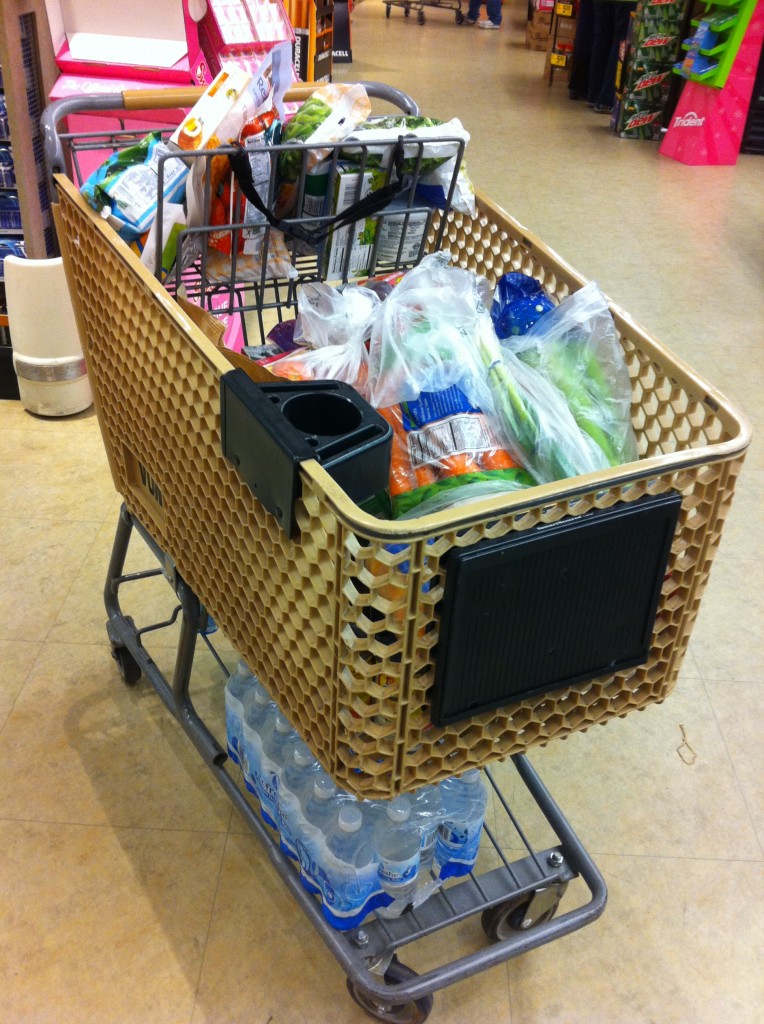
Long story short (or short story long?) I ended up with a full cart of grocery goodness. Observe the deliciousness:

 full grocery cart

The January Challenge was a success! Now time to cook up something yummy.

Modest Beginnings

A wise man once said,

“There’s a difference in living and living well. You can’t have it all, all by yourself.
Something’s always missing ’til you share it with someone else.
There’s a difference in living and living well.”

It’s a sappy sentiment I come back to time and time again. Now don’t worry, this won’t be a super-sappy blog full of lovey dovey, but it does give a nod to what inspired this blog: exploring ways to enrich my life and the life of my little family, learning through trial and error, starting (and eventually finishing!) DIY projects from simple (salvaging a collection of thrift-store picture frames) to ambitious (building a laundry hamper cabinet) to downright insane (we’ll see if that happens down the line). It’s a sentiment I call on when I’m elbow-deep in lacquer or sawdust or mud, and ask myself if I’ve finally gone too far with a project. And then I realize, no. I sure haven’t. Because this is all part of learning to live better.

My husband, dog, and I live in a 1960s ranch-style house that we purchased in December 2009 with our minds made up that some renovation was definitely in order. Little by little, we’re carving out the 1960s flair (green-gray vinyl living room tile, anyone?) and replacing it with our own style and design choices, all while keeping a pretty modest budget. We’re learning from others, both in blog-land and the real world, how to save money on projects by giving it the ol’ college try, with a splash of professional assistance for those bigger projects. And so far we’ve been, for the most part, pretty successful.

This blog is my way of sharing my projects and ideas for “learning to live better,” for lack of a better description, and hopefully helping/inspiring you (my eventual readers) to do the same. And to in turn share your discoveries with someone else.

The goal for my little piece of blog-land is not dissimilar to the goal for our home: evolution over time from modest beginnings into something amazing and truly our own! Fingers crossed for a well-rounded blog chock-full of DIY projects and home/garden/life improvement tips!

So without further ado, on with the show!